Friday, August 23, 2013

Hare Polish Neon Palm Swatch And Review

Happy happy Friday!  The summer is almost over and I hope everyone has great plans for the weekend!  I'll probably be cleaning the house and running some errands which probably sounds like no fun, but believe me, that's a good weekend for me these days.

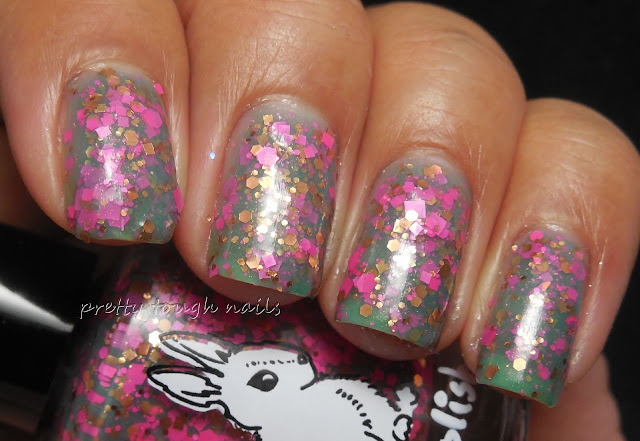
Today I have a swatch of one of the polishes from Hare Polish's newest collection, and this one is called Neon Palm.  I wasn't too sure what to expect once the polish was on the nail, but the bottle looked like a neon pink party in a bottle.  I used four coats and discovered that it had a sheer grayed out army green jelly base.  To contrast the green, there was a multitude of pink, gold, and bronze hex and square glitter.  I thought the glitter to base ratio was a little off because I experience some clumping of the larger glitters, and by the fourth layer, it seemed like I still didn't have any opacity of the base but I was overloaded with glitters.  I finished with a layer of Essence Gel Look Nails to smooth the glitters and then a layer of NYC GCS to hasten drying.

Hare Polish Neon Palm

Hare Polish Neon Palm

Hare Polish Neon Palm

Hare Polish Neon Palm

Hare Polish Neon Palm
Once on, the glitters actually don't look too overcrowded, but it's all personal preference.  I think I still would have like a little less glitter and more opacity, but regardless, it's still a beautifully crafted polish.  I think another solution would be to layer this over a base color and then use only two coats of Neon Palm to get the same effect.  Overall, I'm loving the colors in this polish and I think there's still a lot of potential of using this in the future.  Have you picked up any of the new Hares?

Wednesday, August 21, 2013

Rainbow Hearts Nail Art

A little something off the beaten path today here on the blog for you ladies.  The other day I was browsing instagram and saw a pic that inspired some nail art brainstorming.  I can't on earth find the original pic that inspired me, but it was basically a rainbow of hearts overlapping each other.  I used this inspiration to create a nail art mani that was mostly freehanded and finished with a nail tattoo and dotting tool.  I used a bunch of different colors, including some of my Bettinas, China Glaze Lemon Fizz, Essie Butler Please, and Zoya Purity.  I used the cloud technique to make overlapping hearts and the dotting tool to make the mini hearts.

Rainbow Hearts Nail Art

Rainbow Hearts Nail Art
The nail tattoo I used is from the Fing'rs new Heart 2 Art collection. I never used a nail tattoo before and it took me a minute to figure it out.  I forgot to take off the plastic first before soaking in water, so I wasted my first tattoo.  I got it on the second try.  Luckily the tattoos are super cheap and you quite a few in the package.  Each piece is big enough to cut into two pieces which will each fit a full finger.  Each package contains three different designs too!  My only real difficulty was clean up - the package says to cut the tattoos to shape, which of course I didn't.  I tried acetone to clean up the edges and that didn't work too well.  Some of the tattoo ended up dragging along my cuticles instead of dissolving like I hoped.  I finished all the nails, including the tattoo, with a layer of Poshe.

Rainbow Hearts Nail Art
I'm not a flowers or hearts kind of gal, but I really like how this turned out!  Rainbows are always a great way of utilizing a wide range polish colors while looking fun and vibrant.  Hmm... after this project, I want to venture out and try some more nail art... stay tuned for more!